

Common PPF Installation Problems (Bubbles, Peeling, Dust) & How to Avoid Them
Facing PPF installation issues? Learn common problems like bubbles, peeling, and misalignment, their causes, and expert tips to avoid them for a flawless finish.
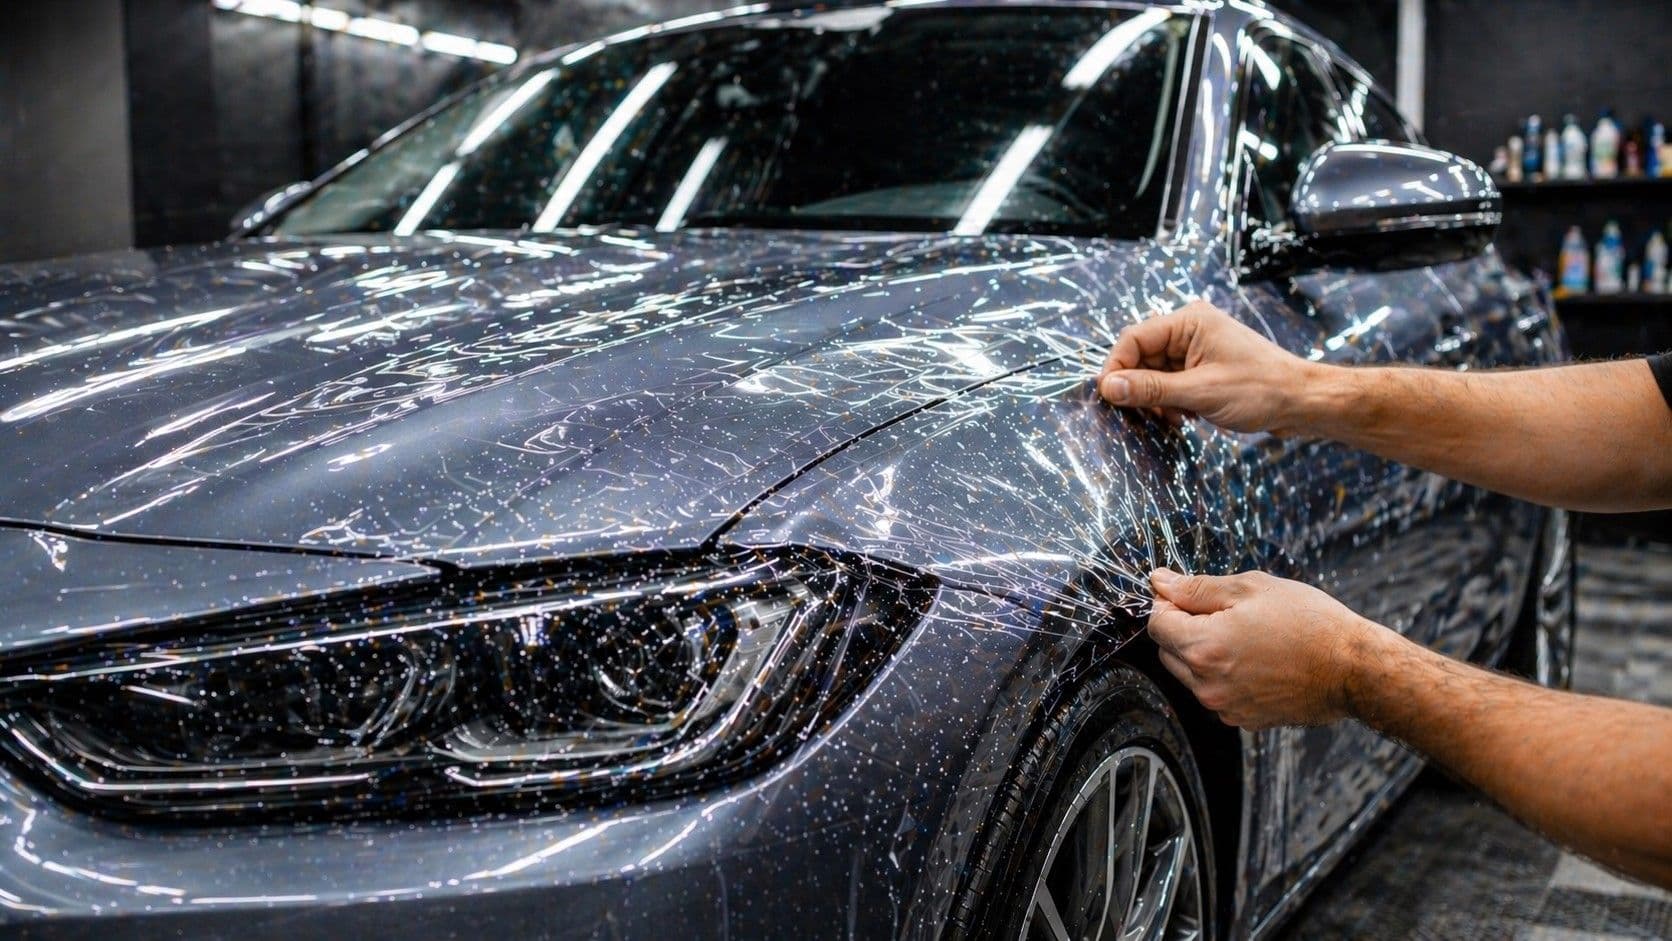
PPF installation problems are something many car owners and installers deal with, especially when the expectation is a perfectly smooth finish. Problems like paint protection film bubbles, PPF peeling issues, and dust under PPF can spoil the overall look and reduce how well the film performs. Since PPF is meant to be almost invisible, even small defects can stand out and feel disappointing.
In most cases, these common PPF problems are not about the film itself. They usually happen because the surface was not prepared properly, the installation method was not right, or the environment had dust or moisture.
Let’s understand these issues in a clear and simple way, along with practical steps that help avoid them and achieve a clean, professional PPF finish.
Why Proper PPF Installation Quality Matters More Than the Film Itself
The way PPF is installed plays a big role in how it actually looks and holds up over time. When it’s done right, the film stays clear, sits smoothly on the surface, and does its job of protecting the paint.
When it’s not done properly, the problems show up pretty quickly. You might see bubbles, slight haziness, or areas that don’t look even. In some cases, the film doesn’t stick well and starts lifting or peeling earlier than it should.
Good installation comes down to care and control. When that’s in place, the film bonds better, lasts longer, and looks consistent across the car.
Most Common PPF Installation Problems and What Causes Them
Several defects are frequently observed during or after installation. Each of these issues affects both the visual outcome and the protective capability of the film.
Air & Moisture Bubbles (Bubbling)
Bubbling is one of the most noticeable Paint Protection Film issues. It shows up as small air pockets or raised spots under the film. The size can vary depending on how much air or moisture gets trapped during installation.
Smaller bubbles, often called the PPF silvering issue, usually happen when tiny amounts of moisture get stuck between the adhesive and the paint. Knowing why PPF bubbles form often comes down to simple installation mistakes, like not using the squeegee properly or not having enough slip solution.
If these bubbles are not handled the right way, they can affect the clarity and make the film look uneven.
Peeling or Edge Lifting
PPF edge lifting usually shows up around corners, edges, and curved areas where the film finds it harder to stick properly. It happens when the film doesn’t bond fully or when outside factors start weakening the adhesive.
As time passes, these lifted edges can let dirt and moisture get underneath, making things worse. These PPF peeling issues don’t just affect how the car looks; they also reduce how well the film protects the surface.
Handling the edges carefully during installation and sealing them properly goes a long way in avoiding this problem.
Dust & Contaminants
Dust contamination appears as small particles trapped beneath the film, often visible as dark specks or uneven spots. This is commonly described as dust under the PPF, and it remains one of the most frustrating installation defects.
Once trapped, these particles cannot be removed without lifting or replacing the film. Such PPF installation defects usually occur in environments that are not properly controlled or cleaned.
Maintaining a clean workspace is critical to avoiding this issue.
Adhesive Issues (Silvering / Cloudiness)
Sometimes the film can look slightly cloudy or have a silvery effect underneath. This usually comes from the adhesive not settling properly, and it’s one of the common PPF installation mistakes.
It can happen if the film is stretched too much or if pressure isn’t applied evenly during installation. In some cases, the film doesn’t get enough time or the right conditions to cure, so it doesn’t bond the way it should.
These kinds of issues mostly come down to how the film is handled and how well it’s allowed to settle after installation.
Main Reasons Behind Common PPF Installation Mistakes
Understanding the root causes of common PPF problems helps in both prevention and correction. These issues rarely occur randomly and are usually linked to specific installation errors.
Poor Surface Preparation
If the surface isn’t cleaned properly, problems are almost guaranteed. Even a little dust, oil, or residue can keep the film from sticking the way it should.
Skipping steps like claying or an IPA wipe makes it easier for particles to get trapped, which is how you end up with dust under the PPF or areas where the film doesn’t hold well.
Getting the surface fully clean before installation makes a big difference in how the film settles and lasts.
Improper Installation Technique
A lot of PPF installation mistakes come down to how the film is applied. If the squeegee pressure isn’t even, air can get trapped. If the passes aren’t consistent, some areas don’t bond properly.
Stretching the film too much can also cause problems. It can affect the adhesive and lead to distortion later on.
These kinds of mistakes often show up as bubbles, lifting, or an uneven finish. Taking time and being consistent during installation makes a big difference.
Uncontrolled Environment
The space where PPF is installed matters more than it seems. If the area isn’t controlled, dust in the air can settle on the surface during application and cause problems.
Poor lighting makes it harder to spot mistakes while working, and if the temperature isn’t right, the adhesive may not perform properly. All of this can lead to different PPF installation defects.
Working in a clean, enclosed space helps avoid these issues and gives a better overall result.
Incorrect Use of Heat & Slip Solution
Using the heat-and-slip solution the wrong way can cause issues during installation. Too much heat can affect how the adhesive behaves, and not enough slip solution can make the film stick too quickly or move unevenly.
This is often how paint protection film bubbles show up, along with areas where the film doesn’t sit properly on the surface. When both are used in the right amount, the film goes on more smoothly and is easier to adjust.
Low-Quality Film
The quality of the film itself makes a big difference. Low-grade PPF often comes with weaker adhesive or uneven thickness, which can affect how it sits and performs.
Even with a proper installation, these films are more likely to show paint protection film issues over time. Using a good-quality PPF helps avoid these problems and gives more consistent results.
How to Fix Common PPF Installation Problems
Fixing these issues needs a bit of care so things don’t get worse. What you do really depends on the type of problem and its severity.
Fixing Air & Moisture Bubbles
Small bubbles usually go away on their own within a week or two as the film settles and dries. This happens as the trapped moisture slowly evaporates.
If the bubbles don’t disappear, gentle heat and going over the area again with a squeegee can help push the air out. In some cases, a very fine needle is used as part of how to fix PPF bubbles.
Taking care of it early helps bring back a smooth finish.
Fixing Peeling or Edge Lifting
If the edges start peeling, it’s better to deal with it early before it spreads further. Cleaning that area first helps remove any dirt or buildup that’s stopping the film from sticking.
A bit of controlled heat can help the adhesive settle again so the film sticks back properly. In some cases, edge sealers are used to stop the issue from coming back, especially with PPF peeling issues.
Fixing it on time helps the film sit right again and keeps it doing its job.
Fixing Dust Contamination
Dust contamination is difficult to correct once it occurs. Minor cases may involve lifting the film and reapplying it after cleaning the surface.
Severe contamination often requires complete replacement of the affected section. These types of PPF installation defects emphasize the importance of prevention rather than correction.
A clean installation environment remains the best solution.
Fixing Adhesive / Silvering Issues
A cloudy or silvery appearance usually indicates that the adhesive has not settled properly. Applying controlled heat along with firm, even pressure can help improve adhesion and reduce the visual defect.
In many cases, it also improves on its own if you give it enough time to cure. Handling the PPF silvering issue early makes a difference and helps avoid that dull or uneven look later.
A bit of patience and careful handling usually brings the finish back to normal.
How to Avoid PPF Installation Problems from Day One
It’s better to prevent issues than deal with them later. A proper process helps reduce PPF installation problems and ensures consistent results.
Step 1: Complete Surface Preparation Before PPF Application
Surface preparation involves a few key steps that must be carried out properly. It starts with washing the car to remove dirt, followed by a fallout remover to clear deeper contaminants.
A clay bar is then used to further clean the surface, and an IPA wipe removes any remaining residue. This process helps reduce the chances of dust under PPF and improves how well the film adheres.
A properly cleaned surface supports better durability and overall finish.
Step 2: Install PPF in a Dust-Free Controlled Environment
The place where the film is installed makes a noticeable difference. A clean, enclosed space helps keep dust away and reduces the chances of contamination.
Good lighting makes it easier to spot small mistakes while working, so they can be corrected right away. Keeping the temperature in the right range also helps the adhesive work as expected.
All of this helps reduce PPF installation defects and leads to a cleaner finish.
Step 3: Use Correct Film Positioning and Squeegee Technique
Using the right method makes a clear difference in how the film turns out. Working from the center toward the edges helps push out trapped air and keeps the surface even.
Going over the area with steady, overlapping squeegee passes helps cover everything properly. At the same time, avoiding too much stretching keeps the adhesive intact.
These PPF installation tips help achieve a clean, even finish and reduce the chances of issues later.
Step 4: Maintain Correct Slip Solution Balance
Slip solution helps position the film properly before it sticks. A mix of distilled water and mild soap gives enough movement to adjust the film without losing control.
If there isn’t enough solution, dry spots can form and cause issues during application. Using it properly helps reduce paint protection film bubbles and keeps the surface even.
Getting this step right makes the overall finish cleaner and more consistent.
Step 5: Seal and Heat-Set Edges Properly
Edges are where most issues start, so they need extra attention. Wrapping the edges properly helps protect them and keeps dirt from getting in.
Using a little heat helps the film settle at the edges, but it needs to be done carefully to avoid affecting the adhesive. In some cases, extra sealing is used to prevent PPF edge lifting over time.
Handling the edges well helps the film stay in place and last longer.
Post-Installation Care to Prevent New PPF Problems
Care after installation plays a big role in how the film holds up. The film needs some time to settle so the adhesive can bond properly with the paint.
It’s best not to wash the car for at least 48 to 72 hours. During this time, natural curing, aided by mild sunlight, can remove residual moisture and improve bonding.
Avoid touching or disturbing the edges while the film is still settling. Taking care during this phase helps reduce the chances of new paint protection film issues.
When Should Poorly Installed PPF Be Replaced?
It’s important to check the finish after installation to make sure everything is done properly. The film should appear smooth, clear, and evenly laid across the surface.
Once the film has settled, there shouldn’t be any visible bubbles, and the edges should sit cleanly without lifting or allowing dirt to creep in. A high-quality installation, such as one done using Global Hi-Tech Films, typically reflects this level of precision and finish.
If there’s no haze, dust, or distortion, it’s a good sign the job has been done right. These simple checks go a long way in confirming a clean, professional result.
When Should You Replace Poorly Installed PPF?
Replacement is needed when the issues don’t improve even after trying to fix them. If bubbles stay even after the film has settled, it’s a sign that something isn’t right.
The same goes for heavy peeling, edges that keep lifting, or dirt stuck under the film. A cloudy look from adhesive problems is another sign the film isn’t performing properly.
In such cases, replacing the film is the only way to bring back both protection and a clean finish.
Final Checklist to Avoid PPF Installation Problems
The table below shows the key steps to reduce installation errors and help the film last longer.
| Phase | Action |
|---|---|
| Preparation | Clean the surface properly using a clay bar and IPA wipe |
| Environment | Work in a clean, enclosed space with good lighting |
| Installation | Start from the center, use steady squeegee strokes, and proper slip solution |
| Post-Install | Avoid washing for 48–72 hours and let the film settle properly |
Following these steps helps reduce PPF installation problems and leads to a better overall finish.
Final Verdict: Most PPF Installation Problems Are Preventable
Most common PPF problems can be avoided if the installation is done properly from the start. The way the film is installed has a direct impact on how it looks and how long it lasts.
A clean space, the right technique, and good-quality film all play a role in getting a smooth and durable finish. When these are in place, the chances of issues are much lower.
FAQs About PPF Installation Problems
- What causes bubbles in paint protection film (PPF)? Bubbles usually form when air or moisture gets trapped during installation, often due to improper technique or surface preparation.
- Do PPF bubbles go away on their own after installation? Small bubbles often disappear within a few days as the film settles, but larger ones may need professional correction.
- Why does PPF peel or lift at the edges? This usually happens when the edges aren’t properly sealed or when dust, moisture, or weak adhesion interferes with the bond.
- Can dust under the PPF be fixed without removing the film? Unfortunately, once dust is trapped underneath, that section typically needs to be removed and redone.
- What is silvering in PPF installation? Silvering looks like tiny grey or silvery dots under the film, often caused by very small air pockets or uneven contact.
- How long does it take for PPF to fully cure? The film settles within a couple of days, but complete curing can take up to two weeks, depending on conditions.
- Can heat fix bubbles or adhesive issues in PPF? Heat can help with minor bubbles or slight lifting, but it won’t correct bigger installation issues.
- When should I replace poorly installed PPF? If defects like bubbles, peeling, or visible flaws don’t improve over time, replacing them is usually the better choice.
- Does installation quality affect PPF performance and lifespan? Absolutely, a good installation plays a big role in how well the film performs and how long it lasts.
Read also
 Global Hi-Tech FilmsWindow Films
Does Automotive Window Film Affect GPS, Mobile Signals or Keyless Entry?
Does automotive window film affect GPS, mobile signals or keyless entry? Learn how film construction can influence vehicle connectivity and signals. Explore now.
 Global Hi-Tech FilmsArchitecture
Can Window Film Be Applied to Double-Pane and Low-E Glass?
Can window film be used on double-pane and Low-E glass? Learn about compatibility, glass types, thermal stress and key installation factors. Explore now.
 Global Hi-Tech FilmsWindow Films
Why Does Automotive Window Film Bubble, Peel or Change Color?
Discover why automotive window film bubbles, peels or changes color, the common causes of film failure, and how quality installation helps prevent damage.