

How to Install Paint Protection Film (PPF): A Complete Guide
Learn how to install Paint Protection Film (PPF) with this step-by-step guide. Discover tools, tips, installation techniques & expert advice for flawless car paint protection.
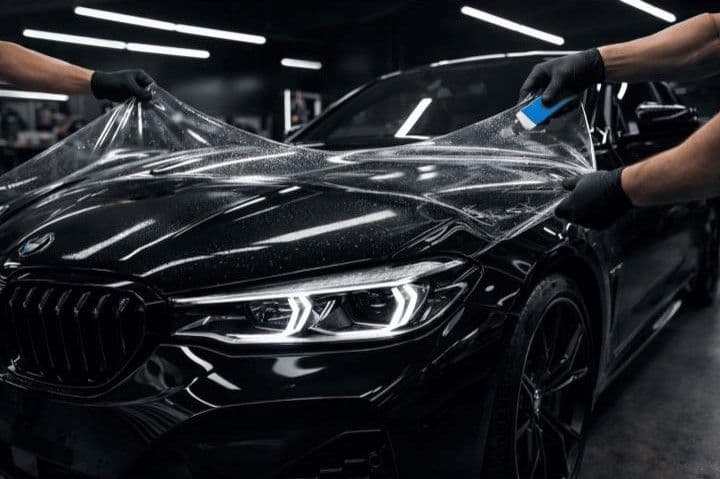
As a car owner, you invest heavily to maintain your vehicle’s appearance, but everyday driving can expose the paintwork to scratches, stone chips, UV damage, and swirl marks. Paint Protection Film (PPF) is a proven solution, yet many owners hesitate to install it themselves due to fears of bubbles, wrinkles, peeling edges, or permanent damage to paint.
Understanding how to install paint protection film (PPF) is not difficult, but it is technical. Success depends on how well you prepare the surface, correct solution ratios, precise alignment, controlled tension, and proper edge sealing. Even a small mistake, such as installing the film on a dusty surface or overstretching the film, can compromise the final finish.
Let this blog be your step-wise guide to help you install paint protection film (PPF). We will walk through each stage of DIY PPF installation: from preparation to final curing. With patience and the right technique, beginners can achieve clean, professional-looking results on individual panels or high-impact areas.
Essential Materials and Tools
Having the right materials before you start is a critical first step to paint protection film installation. Interruptions during installation increase the risk of dust contamination and alignment errors. Here is a list of the important tools required for PPF installation.
PPF Film
Pre-cut PPF kits are strongly recommended for beginners. They are vehicle and panel-specific, eliminating complex cutting and reducing the risk of paint damage. Bulk rolls require advanced skill and precision. Choose a high-quality film from brands such as Global Hi-Tech Films.
Slip Solution
- Formula: 1 litre of distilled water + 2 ml of shampoo.
- Purpose: Allows the film to glide on the surface, enabling repositioning and bubble-free alignment.
Tack Solution
- Formula: 150 ml 99% isopropyl alcohol +850 ml distilled water.
- Purpose: Allows the film to glide on the surface, enabling repositioning and bubble-free alignment.
Tools Required
- Hard squeegee (for flat areas)
- Soft squeegee (for delicate surfaces and curves)
- Microfiber towels (lint-free)
- Spray bottles (separate for the slip and tack solutions)
- Heat gun (essential for curves and edge wrapping)
- Clay bar (for decontamination)
- Sharp utility knife or precision scissors
Preparing Your Car for PPF
Preparation accounts for over 70% of the success in the PPF installation process.
Start by working in a dust-free, shaded, and windless area. Direct sunlight or airflow causes premature drying and traps airborne particles:
- Wash the vehicle thoroughly using a pH-neutral shampoo.
- Use a clay bar to remove any bonded contaminants such as tar, brake dust, and industrial fallout.
- Dry the surface completely using microfiber towels.
- Wipe each panel with isopropyl alcohol to remove oils, wax residue, and invisible contaminants.
The surface must feel perfectly smooth, clean, and dry before installation. Any debris left behind will be permanently trapped under the film.
Step-by-Step PPF Installation
There are 7 paint protection film installation steps, starting with measurement, surface preparation, positioning, trimming, heat application, and finally, adjustments.
Step 1: Measure and Cut the Film
Accurate measurement prevents waste and misalignment.
- Measure each panel carefully.
- Add an extra margin of 1 to 2 inches on all sides.
- Use a sharp blade or scissors for clean cuts.
- Label each piece according to its panel to avoid confusion during installation.
Avoid cutting directly on paint. Consult a professional installer if you need to.
Step 2: Prepare Slip Solution
Mix the slip solution and pour it into a spray bottle.
- Spray generously on the panel.
- Spray on the adhesive side of the PPF.
- This creates a lubricated surface that allows repositioning and significantly reduces air bubble formation.
This creates a lubricated surface that allows for repositioning and reduces air bubble formation.
Step 3: Position the Film
Place the film gently onto the panel, starting from the top, and working downward:
- Align edges, badges, and the contours carefully.
- Ensure full coverage before squeegeeing.
- Work slowly; rushing can cause creasing and misalignment.
The slip solution will give you time to adjust, so use it.
Step 4: Remove Air Bubbles
Use a squeegee to remove any air bubbles by:
- Start from the center and push outward toward the edges.
- Apply firm, even pressure.
- If a bubble appears, lift the section, respray the slip solution, and reapply.
Never force bubbles out without the solution; it risks stretching or tearing the film.
Step 5: Trim the Edges
Once the main surface is set:
- Carefully, trim the excess film.
- Use masking tape near the edges to protect the paint.
- Make multiple light passes rather than a single deep cut.
Precision here determines long-term durability and visual finish.
Step 6: Heat Application
Heat is essential for:
- Curves
- Recessed areas
- Wrapped edges
Use a heat gun on low to medium setting.
- Warm the film gently.
- Stretch lightly; never pull aggressively.
- Immediately squeegee to lock the film into place.
Heat activates the adhesive, preventing the edge from lifting.
Step 7: Final Inspection and Adjustments
Inspect the panel closely:
- Look for trapped moisture, bubbles, or lifting edges.
- Minor imperfections that can be fixed using tack solution and heat.
- Allow the film to cure for 24 to 48 hours before washing or driving in rain.
Tips for a Successful PPF Installation
Here are some pointers to ensure a successful car PPF installation:
- Avoid overstretching; it will cause the PPF to lift later.
- Keep your hands and the film surface moist to prevent scratches.
- Lift and respray immediately if there is dust trapped.
- Use heat strategically, not aggressively.
- Patience and alignment matter more than speed, so go slow and steady.
Maintaining your PPF After Installation
Proper maintenance can extend the PPF’s lifespan. So follow these tips to ensure that your paint protection film installation lasts longer:
- Wash gently using approved, non-abrasive products.
- Avoid using any harsh chemicals or rough cloth while cleaning.
- Inspect edges periodically for early signs of lifting.
- Minor edge lifting can be corrected with tack solution and heat.
Common Mistakes to Avoid
Here are some mistakes you can avoid while following the PPF installation process:
- Skipping the alcohol wipe during preparation.
- Overstretching film on curves.
- Rushing the squeegee passes.
- Ignoring heat on complex shapes.
- Handling the film with dry hands.
These mistakes can lead to the film failing prematurely.
Quick Checklist for PPF Installation
Ensure you follow this checklist for proper step-by-step PPF installation:
- Car washed, clayed and dried.
- Alcohol wipe completed.
- Slip and tack solutions mixed.
- The tools and heat gun are ready.
- Film measured and positioned properly.
- Bubbles removed properly.
- Edges wrapped and heat-sealed.
- Final inspection completed.
Conclusion
A professional PPF installation comes down to thorough preparation, correct solution usage, controlled squeegeeing, and proper heat sealing.
When done properly, DIY-installed PPF can provide long-term paint protection, improved resale value, and resistance against daily wear. However, full-car installations and complex curves demand advanced skill. If you are unsure about what steps to take, seek help from a professional installer to ensure flawless results without risk.
FAQs
- Can I install paint protection film (PPF) myself at home? Yes, especially on small or flat areas using pre-cut kits. Complex curves may be harder for beginners.
- What tools and materials do I need for PPF installation? You will need the PPF film, slip solution, tack solutions, spray bottles, squeegees, microfiber towels, clay bar, and a heat gun.
- How do I properly prepare my car surface before installing PPF? Wash, clay, dry, and wipe the surface with alcohol to ensure a clean, smooth surface.
- How do I remove air bubbles and ensure smooth adhesion? Squeegee from the center outward, lift and respray solutions if the bubbles remain.
- How do I trim and seal PPF edges without damaging paint? Use a sharp blade lightly, then apply heat and tack solutions to secure the edges.
- Can I fix mistakes, like bubbles or dust trapped under PPF? Yes. Lift the film, clean the surface, respray the solution, and reapply if caught early.
- Should I attempt full-car PPF installation or hire a professional? DIY is best for small sections; full car installations are better handled by professional installers.
Read also
 Global Hi-Tech FilmsWindow Films
Does Automotive Window Film Affect GPS, Mobile Signals or Keyless Entry?
Does automotive window film affect GPS, mobile signals or keyless entry? Learn how film construction can influence vehicle connectivity and signals. Explore now.
 Global Hi-Tech FilmsArchitecture
Can Window Film Be Applied to Double-Pane and Low-E Glass?
Can window film be used on double-pane and Low-E glass? Learn about compatibility, glass types, thermal stress and key installation factors. Explore now.
 Global Hi-Tech FilmsWindow Films
Why Does Automotive Window Film Bubble, Peel or Change Color?
Discover why automotive window film bubbles, peels or changes color, the common causes of film failure, and how quality installation helps prevent damage.